Wood Shop Communication Center

Photo Nov 19, 2 46 09 PM

This was one of the things I was most excited about with my new shop build.  I know it sounds crazy, but I just couldn’t wait to put it all together.  I actually sketched it out months before the shop was completed.  (It’s the little things in life…lol)

In hindsight, I should have had our contractor add more studs to this wall to make hanging these modules easier.  So, if you are building new, do that!! Luckily, most of these aren’t very heavy and I could use mollies and screws to mount them.

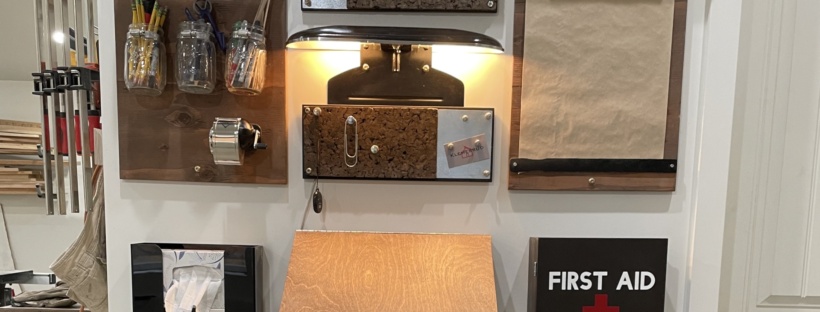
Here’s a pic of the completed wall.

I’m thinking that it might need a piece of artwork or logo at the top.  We’ll see if I can come up with something.

1. Paper towel, pencil cups and sharpener

This was a piece I made for my garage/shop a couple of years ago and brought it over to the new shop. It holds so many shop necessities. (Pencils, pens, sharpies, small ruler, compass, etc.)  I used hose clamps to hold the mason jars. I gifted myself some new no.2 pencils as a “ shop warming” gift. I love office supplies almost as much as I love my new shop…almost!

Dimensions:

Materials

  • ½ or ¾ inch scrap plywood
  • Paper towel holder
  • 3 hose clamps
  • 3 mason jars
  • Pencil sharpener
  • Screws
  • Finish Washers
  • Wood stain (I used  ?)
  • Poly varnish (I used ?)

I placed the plywood on the table and arranged the items, spacing them out as necessary.  Mount each item with screws then secure it to your wall. I used mollies, screws, and finish washers to secure to the wall. This one has to be secured pretty well so that you can crank on the sharpener.  I love an old-fashioned pencil sharpener. The electric ones are TERRIBLE!  Plus, it reminds me of my elementary school days when you could waste class time by dawdling at the sharpener and pass your bestie on the way and poke her! lol

Photo Nov 19, 2 46 26 PM
Ahhhhh....Fresh no.2 pencils make me happy.

2. Cork & Magnet Board

This space is great for hanging templates, business cards, etc.  I made them to fit the extra space I had above and below the light. I just used scrap wood I had leftover from previous projects.


Photo Nov 19, 2 46 35 PM

Dimensions:  6 in x16 in and 9 in x16 in

Materials:

I cut the plywood to the dimensions of my empty spaces. I sanded and painted them black. Next, I cut the sheet metal with a small band saw. You could also use tin snips for this. Sand the edges of the metal to smooth out any burrs.  I’m lucky that my husband has a metal shop so I used his de-burring wheel for this.

Glue the metal in place with some wood glue and clamp. We’ll screw it down in the next step. You can glue and clamp the cork side as well. I overlapped the cork onto the metal by a half an inch.  Let this dry for a couple of hours.

Pre-drill the metal before mounting it to the wall. I used screws and finish washers for a clean look.
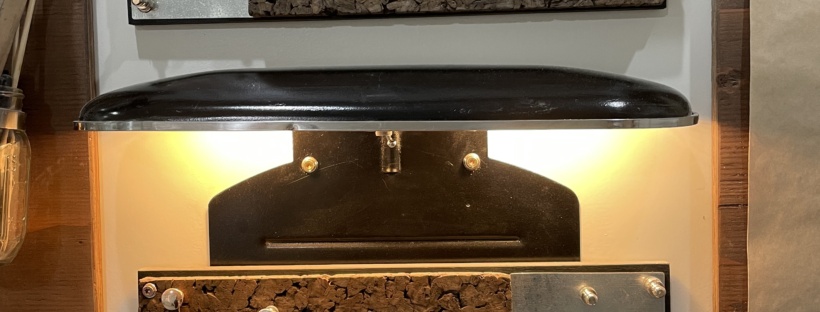
 

3. Vintage Light

This is my favorite part of my communication center wall. This was the reason I designed it in the first place. This light belonged to my grandmother. It originally was part of her O’Keefe & Merritt electric stove/oven. When the appliance finally needed replacing my grandfather couldn’t bear throwing out a perfectly operational light. He removed it from the stove and hung it above the wall phone. Yes, a phone, with a cord, that hung on the wall! I just realized that my grandmother had a communication center as well.  I hadn’t put that together until now.  Her cubby space was just inside the entry door. It had a cup with pencils, scrap paper for messages, a bill box, phone book, address book, and a calendar on the wall. Such a great memory for me.

light cropped

I've written a more in-depth post about it. Click below.

4. Craft Paper Roll

This is a fun and easy project.  I use it to jot down measurements, shopping lists, and phone messages. And it’s easy to tear off a piece of paper.


paper roll

Dimensions:  14 in wide x 23 in tall (Same as the paper towel roll)

Materials:

  • ½ or ¾ plywood
  • Curtain rod (or you could use a paper towel holder or dowel)
  • 2 paint sticks (free from your paint store)
  • Screws
  • Finish Washers
  • Roll of painter’s paper
  • Spray paint
  • Wood stain
  • Poly

Cut the plywood to your preferred size.  I made the paper towel holder and the craft paper dispenser the same measurement. Sand, stain and seal the wood.

I used a salvaged curtain rod to hold the paper roll and a paint stick to hold the end down.  This makes it easy to tear off a length.

It was mounted with mollies, screws, and finish washers.

I spray painted the paint sticks to keep everything cohesive.

5. Glove & Tissue Dispenser

I thought this one was a no-brainer, but my husband totally made fun of me when I installed this.

I use both of these items all the time in my shop. Now I catch him using it!

I found it on Amazon.  Here's the link.

gloves

6. Stand-Up Desk

Photo Nov 19, 2 46 33 PM

Dimensions: 16 in wide x 9 inches tall x12 in deep

Materials:

  • ¾ inch birch plywood
  • Wood glue
  • Brad nails
  • Stain
  • Piano hinge
  • Screws

This was an adaptation from this Kreg Tool post. I altered it to fit my space and left off the peg board.

1Tool-Storage-Center-01
Photo Aug 25, 2 27 34 PM
Photo Aug 25, 2 27 45 PM

7. First Aid Box

Photo Nov 19, 2 46 14 PM

I don't have to tell you that this is a shop necessity. It just has a few of the essentials with the thought that if a bandaid doesn't fix it, you might want to head to the hospital.

I keep bandages, styptic stick, gauze, tape, antiseptic, and eye wash.

Just the other day my husband came into my side of the shop with his finger in his eye asking me to fish a particle out.  I went for the eyewash!  A few blinks with that little cup over his eye and ....bingo!  All better!


Dimensions: 10 in wide x 16 in tall x 5.5  in deep

Materials:

This is just a basic box with a little shelf in the middle.  It can be made to any size. Since it wasn't going to hold anything very heavy, I constructed it with wood glue and brad nails. I added a cleat inside at the top and bottom to make it easier to mount to the wall.

Door
Door
Shelf in the middle
Shelf in the middle
All painted
All painted

The door is plywood as well. It is attached with two 1 inch hinges. I added a magnetic catch, and knob as well.

When the paint was dry I used my vinyl cutter to put the words "FIRST AID" on the front.
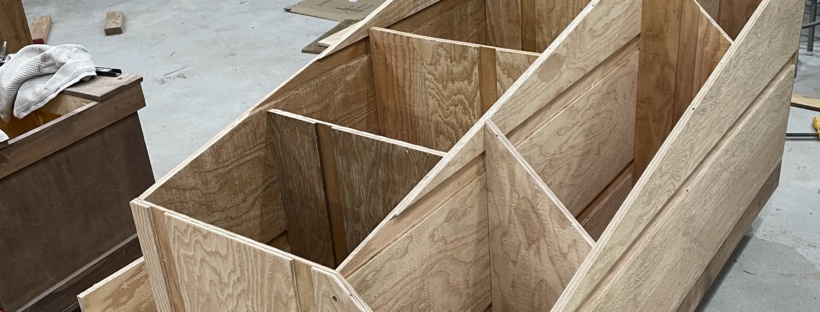
 

Photo Oct 22, 9 24 37 AM
Photo Oct 22, 9 25 58 AM
Photo Oct 22, 9 27 06 AM
Photo Nov 19, 2 46 19 PM
Photo Nov 19, 2 46 14 PM

8. Disposal Cans

All three of these are necessary in a shop.

Trash: Self explanatory

Rags: I use a lot of old towels to wipe off dust on projects before painting and I prefer to wash them instead of using paper towels.  I use paper towels for stain, paint, calk, etc. (substances that don't wash out.) But for dust, and other things I like to be thrifty and not waste resources.

Recycling: Cardboard and aluminum. Basically my husband has a beer fridge on his side of the shop. lol

Photo Oct 09, 11 29 48 AM

I purchased the trash cans at The Home Depot for around $10.

Here's a link for you:


Full disclosure: I used my vinyl cutter  to letter these.  The vinyl just didn't want to stick to the plastic trash can.  I will probably wind up cutting new vinyl and using it like a stencil to paint on the letters. Also, my friend Jon thinks I should change the word "Trash" to "Rubbish" to keep the "R" theme.  lol.

I hope you enjoyed this post and thanks for visiting.

Vintage Light Restoration

This is my favorite part of my work shop communication center wall.

See my post on the new shop communication center here...

This was the reason I designed it in the first place. This light belonged to my grandmother. It originally was part of her O’Keefe & Merritt electric stove/oven. When the appliance finally needed replacing my grandfather couldn’t bear throwing out a perfectly good operational light. He removed it from the stove and hung it above the wall phone. Yes, a phone with a cord that hung on the wall!

I just realized that my grandmother had a communication center as well.  I hadn’t put that together until now.  Her cubby space was just inside the entry door. It had a copper cup with pencils, scrap paper for messages, a bill box, phone book, address book, and a calendar on the wall. Such a great memory for me.

Incidentally, this stove appears in many sitcoms and movies. A similar stove was part of the Everybody Loves Raymond TV set.

LOS ANGELES - APRIL 16:  Marie takes care of the three men in her life on the May 16 series finale of EVERYBODY LOVES RAYMOND.  From left to right:  Brad Garrett, Doris Roberts, Ray Romano, Peter Boyle.  Patricia Heaton featured in background.  (Photo by Robert Voets/CBS Photo Archive/Getty Images)
LOS ANGELES - APRIL 16: Marie takes care of the three men in her life on the May 16 series finale of EVERYBODY LOVES RAYMOND. From left to right: Brad Garrett, Doris Roberts, Ray Romano, Peter Boyle. Patricia Heaton featured in background. (Photo by Robert Voets/CBS Photo Archive/Getty Images)

It originally had a clock on it as well.  I assume that it didn't work and was removed.

The same stove appears in the iCarly series.

Nickelodeon's iCarly set


My dad gave me the light several years ago. I wanted to put it somewhere where I could enjoy it daily and I finally have the perfect spot. But before I could mount it, it needed a little TLC.

Materials:

  • Steel wool
  • Spray paint: black & white
  • New e6 sockets
  • Lamp cord
  • Toggle switch (I bought this at my local Ace hardware.)
  • New light bulbs

It was brown originally and the stainless edging was coming off. It also needed to be rewired. Safety first! The light was so old that the wires are cloth covered.

I disassembled the lamp and lightly sanded everything. I used 000 steel wool to polish the stainless edging. Next, I taped off the exterior of the lamp edge and spray painted the interior of the light.  I used white paint for this so that it would reflect the light well.

Then I painted the exterior of the light with black semi-gloss spray paint. I let everything dry for 24 hours.

light socket

I purchased a new light socket kit, toggle switch, and lamp cord. I followed the instructions on the package and mounted the sockets on the light base.

It was so easy even I couldn't mess it up!

Now the moment of truth….It works!!! I just love it and it is a piece of my grandparents that lives on in my shop.


Photo Nov 19, 2 46 09 PM

Thanks for visiting.

kiss and signature

Lumber Cart Brag Post

Wood shop organization can be a daunting task. Especially if you're like me and keep a lot of scrap wood. FYI-You can make a lumber storage cart and justify keeping ALL of those little pieces.

Some days you wake up and don't know what you're going to accomplish. I had the day to myself and puttered around the shop looking for a project I could check off my list. I was really looking for something that didn't require a drive to the hardware store or lumber yard.

With the weather turning very fall-like this week it was time to get the scrap pile of wood indoors. But in order to do that I needed to organize my lumber...but in order to do THAT I needed to build some storage.

Let me back up a bit.  My husband and I just had a new shop addition built. Now we have his & hers shop spaces. Our contractor/friend (@jasonklemesrud) knows how thrifty I am and was really great about saving the off-cuts and scraps for me to use in future projects.

image_67205889
image_67201025

 The New Shop Addition

It's cute, right? I wanted a shop that didn't look like an industrial eye-sore.

What better way to decrease the scrap pile than to use some of it on the organizer itself?

I'd been pinning lumber storage carts for a while on Pinterest and read/watched several tutorials that are really great. Here are some links to my inspiration that might help you.

Diy Montreal -  Marie's Ultimate Lumber Cart

Ana White - Ana's Lumber cart

Wood Shop Diaries - Shara's Lumber Cart

But Before I Begin

Before I got started I realized that I need to build the circular saw guide that Marie, from Diy Montreal, suggests using.  I've really needed one for a while and this was the perfect time to make it. I just so happened to have enough 3/4 inch birch leftover from a cabinet build so I had no excuses for putting this off any longer. I followed Marie's instructions perfectly and am so happy with how it turned out. I used it a ton in this project too.  It's going to come in so handy in the future.

Diy Montreal's Circular Saw guide Plans  I highly recommend making this. It's so great!


image_67187969
image_67174913

Before pic of my scrap lumber pile

Before photo of the messy scrap wood area in my new shop.

I know I probably keep waaay too many small pieces of wood but I live far from a lumber yard and sometimes they come in handy.

PS.  I can hear you whispering "hoarder"!!! lol

Most of the plans suggest 3/4 inch plywood but I had 1/2 in siding leftover so that's what I used. If I had the option I would have preferred 3/4 inch material but I made it work.

I started with a rough sketch of what I wanted and what would fit into my space. I built the main box and dividers first, then moved on to the front cubbies.

Lot's of pocket holes for this project. They are my favorite!

image_67193345

Then I moved on to the base.  I use scrap 2x4s to make a frame and added 4x4 blocks for the casters to mount to.  Yep,  I split one!  ugh!  I flipped it over and added the base panel.


image_55415491

Almost Done!

I used the miter saw to cut the angles on the front corners and cubbies.

Now to mount the cubicles.  I pre-drilled pocket holes along each bottom edge so mounting it was a breeze. I cut the side panels to size and mounted them as well.

I was able to use up most of the scrap siding and didn't have to purchase ANYTHING for this project.  It was all scrap!!  I even had the casters left over from a salvaged project.  You can find those casters at The Home Depot btw.


image_67197697
image_67206145

It took me most of the day to complete, but it feels so good to be done.

Sheesh!  You can see in the background that I still have a LOT of organizing to do. So many projects to build!!

After

image_50400769

Ta Da! The "After" photo is my fav.  I'm so happy with it!  Thanks to Marie at Diy Montreal, Ana White, and Shara from Wood Shop Diaries for their consistently fantastic projects and plans. 🙂

Before & After

image_67157761
IMG-8681